Welcome to Fireup Documentation!
Thanks for Buying
First of all, thank you for buying this theme. To make your experience pleasant, we've added as much info as needed in this documentation. If you're stuck with anything, please refer to support forums.
- Created by: Theme Junkie
- Version: 1.0.0
- Support Site: Support Forums
Installation
There are two methods to install the theme. If the normal installation method (a) is not supported by your web host, you will have to use the alternate option (b).
a. Normal Installation
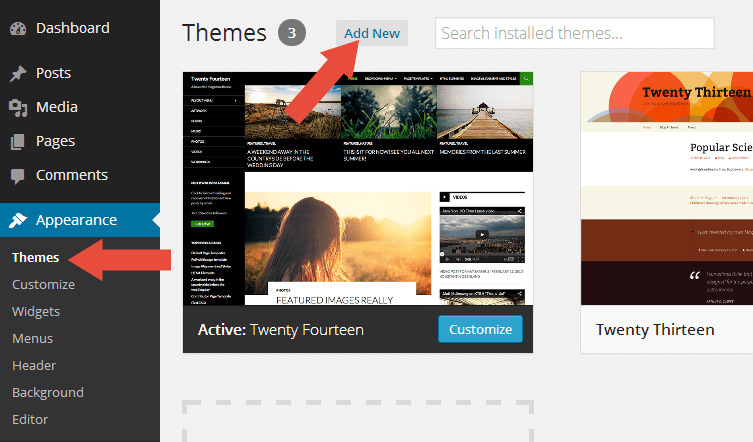
- Log into your WordPress admin panel and go to Appearance » Themes
- Click the Add New button at the top.
- Click the Upload Theme button at the top.
- Click the Choose File button and navigate to the location of the theme zip file.
- Click Install Now to begin the installation.
- Wait for the success message, then click Activate.
b. FTP Installation (alternate method)
- Unzip the theme zip file.
- Using an FTP client to access your host web server. Go to
/wp-content/themes/and place the theme folder inside it. - Log in to your WordPress admin panel and go to Appearance » Themes
- Locate the theme thumbnail and click the Activate link.
Recommended Plugins

When the first time you activated the theme, you will see the notice above about recommended plugins. If you feel the plugins is not needed, then you can click the Dismiss this notice to hide the notice.
If someday you need to install those plugins, you can go to Appearance » Install Plugins . Choose which plugin you want to install.
Important Please note, those plugins is Recommended not required.
Child Theme
WordPress child theme allows you change the functionality of the theme without having to edit the original/parent theme template files. If you plan to making any customization, we recommend to create a child theme instead of editing the theme template files. Since the child theme is stored separately, you don't need to redo the changes next time you upgrade the theme.
Creating a Child Theme
There's a plugin you can use that will create a child theme from within the WordPress dashboard: http://wordpress.org/plugins/child-theme-configurator/or you can download Fireup blank child theme here.
More About Child Theme
You can read more about Child theme on WordPress Codex.
Regenerate Thumbnail
If you use this theme for existing website, we recommended you to install Regenerate Thumbnails plugin to fix the image sizes. Every theme has different image dimensions, so this is important step to do.
How To Use It?
- After you install it, go to Tools > Regen. Thumbnails
- Click the Regenerate All Thumbnails button
- The process depends on how many images on your website. If you only have 10-30 images then process only takes a few minues.
- After the process done, you can deactivate and delete the plugin.
Site Setup
Before you setup another things please do a site setup below.
1. Installing WooComerce Plugin
WooCommerce is the most popular WordPress eCommerce plugin on WordPress.org. Because this theme is a WooCommerce based theme. So, the most important step before setup your online store is installing it.
How To Install WooCommerce?
- Log into your dashboard.
- Go to Appearance > Install Plugins
- Find WooCommerce then click Install.
2. Installing LayerSlider Plugin
One of Fireup feature is you can display a banner/promo slider on home page. We seperate the functionality into a plugin. So, if you don't need this feature just ignore it.
How To Install LayerSlider Plugin?
- Log into your dashboard.
- Go to Appearance > Install Plugins
- Find LayerSlider then click Install.
3. Create Home and Blog Page
You should create these pages to get your site working properly, by default the theme home/index is only showing a list of latest posts which is should be used as Blog page.
Creating Home Page
- Considering you're at new page screen (Pages > Add New)
- Add the title with Home
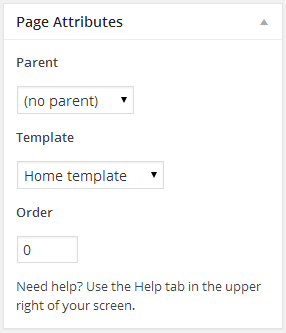
- Under Page Attributes switch the Template to Home Template
- Click publish button
Creating Blog Page
- Considering you're at new page screen (Pages > Add New)
- Add the title with Blog
- Click publish button
Displaying the Pages
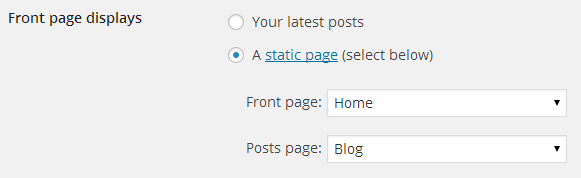
- Please go to Settings > Reading
- Check the A static page option
- Select Home as Front page
- Select Blog as Posts page
- Save Changes.
Home Page Setup
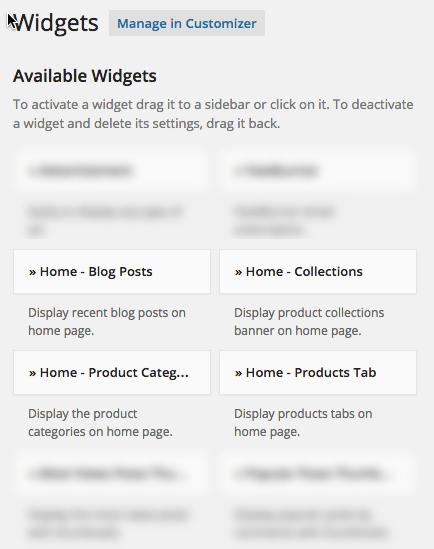
Fireup comes with easy drag n drop to manage the content using widgets. Drag the Home widgets to the Home Sidebar. Below is the explanation which is the widget to use and the sample on the frontend.
LayerSlider WP Widget
This widget is from the LayerSlider plugin, you only need to create a slider then choose which slider you want to use to display on home page.

Home Collection Widget

Home Product Categories Widget
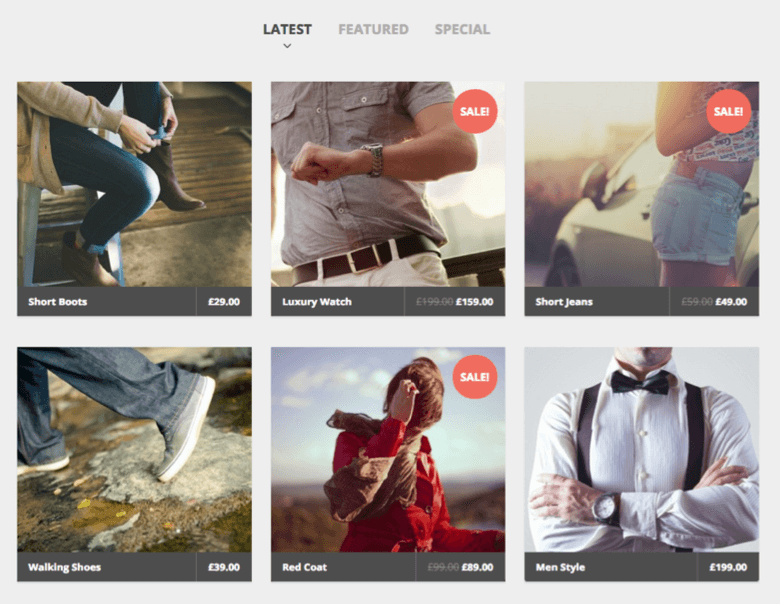
Home Products Tab Widget
Home Blog Posts Widget
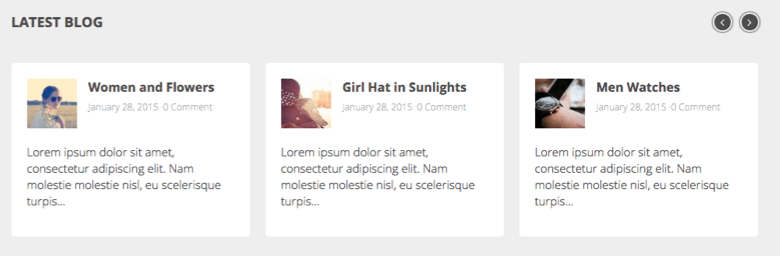
Home widgets
Layouts
You can setup the post or page layout when add or edit the post or page. There are 3 types layout you can choose:
Layouts Type
- Full Width layout : Display the content in a full width mode or without sidebar.
- Left Sidebar layout : Display the content with sidebar on the left.
- Right Sidebar layout : Display the content with sidebar on the right.
Per Page/Post Basis Layout
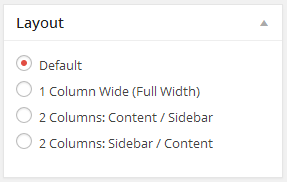
- Assuming you're at the new post or page screen (Posts > Add New) or (Pages > Add New)
- After you create the post or page, scroll down and find Layout meta box.
- Choose the layout.
Teams Page Setup
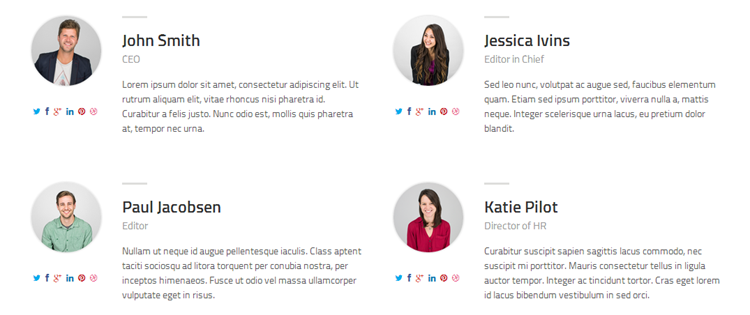
Fireup comes with optional Teams member page to display your website editor or author.
Page Setup
- To display the team data, first you need to install our Teams content plugin.
- Please download on http://wordpress.org/plugins/theme-junkie-team-content/
- Or you can go to Appearance » Install Plugins. Click install under Theme Junkie Team Content.
- You will see a new Teams menu on the left.
- To add new member data, just go to Teams » Add New.
Displaying The Page
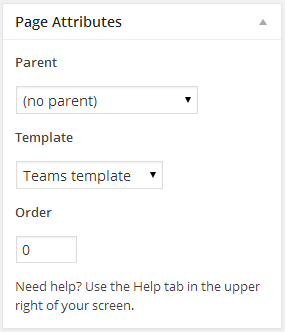
- Assuming you're at new page screen (Pages > Add New)
- Add the title with Teams or About Us or anything.
- Add the description in the Editor.
- Under Page Attributes switch the Template to Teams Template
- Click publish button.
Logo and Favicon Setup
Logo Setup
By default, your site title will be used as a text-based logo. However, you can also use an image-based logo.
- Go to Appearance » Theme Settings .
- Open the General tab.
- Under the Logo , click the Upload button.
- Recommended logo size is 215x60
Retina Logo Setup
Fireup support retina logo.
- Go to Appearance » Theme Settings .
- Open the General tab.
- Under the Retina Logo , click the Upload button.
- Recommended logo size is double the original logo size and give it name eg: [email protected]
Favicon Setup
These favicons are good to have when someone bookmarks your site. Follow the below steps to add it.
- Go to Appearance » Theme Settings .
- Open the General tab.
- Under the Favicon , click the Upload button.
- Recommended favicon size is 32x32
Mobile Icon Setup
This icon will be used when users add your website as a shortcut on mobile devices like iPhone, iPad, Android etc.
- Go to Appearance » Theme Settings .
- Open the General tab.
- Under the Mobile Icon , click the Upload button.
- Recommended favicon size is 144x144
Sidebars and Widgets
Custom Widgets
Fireup comes with 8 cool custom widgets to give you more flexibility to customize your site.
- Advertisement: Easily to show your custom ads, adsense, amazon, etc.
- Feedburner: Allow your reader to subscribe your posts through feedburner service.
- Popular Posts Thumbnail: Display popular posts by comments along with thumbnail and post date.
- Random Posts Thumbnail: Display random posts along with thumbnail and post date.
- Recent Posts Thumbnail: An improvement over the default recent posts widget, including thumbnail.
- Most Views Posts Thumbnail: Display the most views posts along with thumbnail, post date and post view.
- Twitter Timeline: Display an official Twitter Embedded Timeline widget.
- Video: Easily to display your video from some popular video website such as youtube, video, etc.
Sidebars
Fireup provide 5 sidebar areas:
- Home Sidebar: This sidebar is to manage the content on home page.
- Primary Sidebar: Main sidebar that appears on the right of your site.
- Footer(left, center, right) Sidebar: Footer sidebars that appears on the bottom of your site.
Custom Sidebars
Fireup is fully compatible with all of the custom sidebars plugins available for free. Custom sidebars allow you to change the right sidebar to display different widgets on a post or page.
If you wish to use custom sidebars feature, we recommend the Simple Page Sidebars plugin. It's an extremely powerful and flexible free plugin. It's recommended by the Theme to be installed but if you haven't installed it yet, install it from Appearance > Install Plugins (not visible if plugin already installed).
Using the Simple Page Sidebars
- To use this plugin, first, go to Settings > Reading
- Under the Default Sidebar select the default sidebar, in this theme you should select Primary Sidebar
- Go to post or page you wish to change with the new sidebar.
- Scroll down and find Sidebar meta box(see image below).
- Click the Enter New link to create new sidebar.
- Click the Update button.
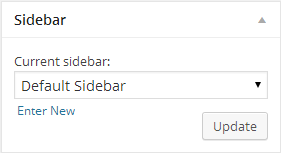
Then, last step is you only need to go to Appearance > Widgets and choose the widget you wish to use then put it in the new sidebar.
Background Setup
Background Setting
Fireup also support WordPress core features Custom Background to help you customizing the background color or image.
- Go to Appearance » Background .
- You can choose the color using the pallete setting or upload an image.
- Save changes.
Others Setup
Change Default Feed URL
If you want to change the default url with your feedburner url, then follow the below steps:
- Go to Appearance » Theme Settings .
- Open the General tab.
- Under the FeedBurner URL , paste your Feedburner url.
- Save Options.
Add Tracking Code
If you want to add a tracking code to your website like google analytics code, then follow the below steps:
- Go to Appearance » Theme Settings .
- Open the General tab.
- Under the Tracking Code , paste the code here.
- Save Options.
Customize Footer Text
If you want to change the footer text, then follow the below steps:
- Go to Appearance » Theme Settings .
- Open the Footer tab.
- Under the Footer Text option, type the footer text you want.
- Save Options.
Custom Code
In some case you will need to add custom script to your website, for example google webmaster meta script or google analytics code. With theWorld you can easily to add it to your website.
- Go to Appearance » Theme Settings .
- Open the Custom Code tab.
- You can use both of these textarea to put your custom code.
- Save Options.
Advertisement Setup
Fireup provides 2 spots for you to display advertisement on single post withouth editing the theme.
Single Post Advertisement
In this page you can display your ads in two areas, before content and/or after content.
- Go to Appearance » Theme Settings .
- Open the Single Post tab.
- Scroll down, you should see two advertisement settings, Before Content Advertisement and After Content Advertisement
- Put your ad code in the textbox.
- Save Options.
NoteYou can also display your ads via widget in your sidebar.
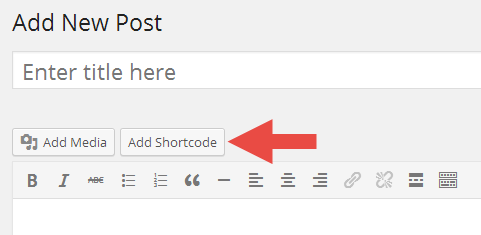
Shortcodes
You can use these shortcodes by installing our Shortcodes plugin which available for free! You can see the shortcodes in action here.
- Please download on http://wordpress.org/plugins/theme-junkie-shortcodes/
- Or you can go to Appearance » Install Plugins. Click install under Theme Junkie Shortcodes.
- Then go to the post or page editing screen.
- You should see Add Shortcode button(see image below) beside the Add Media button.
- Click on it, then you will see a selectbox to choose the shortcodes you wish to use.
- Finally, click the Insert Shortcode button.
Translation & Internalization
All of our themes include a language file to make translating to a different language easy. Inside the theme folder /wp-content/themes/themename/languages, you'll find a language file named themename.pot. Or in this theme file named fireup.pot
Configure WordPress
Before translating the theme, you'll need to make sure WordPress is setup correctly with your locale. Open wp-config.php and modify the line below.
/**
* WordPress Localized Language, defaults to English.
*
* Change this to localize WordPress. A corresponding MO file for the chosen
* language must be installed to wp-content/languages. For example, install
* de_DE.mo to wp-content/languages and set WPLANG to "de_DE" to enable German
* language support.
*/
define("WPLANG", "");
Translating the Theme
- Download and install Poedit.
- Open fireup.pot in Poedit. Translate as needed.
- Save the file with the locale. For example, if you translate the theme to German language then you would save your files as de_DE.po.
- Copy both these files(de_DE.po and de_DE.mo) under the languages folder of fireup.